Hello, and happy New Year! I'm still alive! I know my last post was essentially the same thing... and that was back in June. Time flies! I'm still going and climbing, and I do actually have things I want to post about- but where do you find the time?
As one of my New Years resolutions, I'm going to be updating my blog again. My wall is bigger now, and I've learned a lot from doing it. I have hold reviews and other things ready to go. I have more fantasy gyms... boy, do I have more fantasy gyms. I also want to put up more guides to the routes I did in the summer- I have a few, and there's a real lack of English information on climbing in Hokkaido.
So stay tuned! There's more to come!
Wednesday, January 7, 2015
Wednesday, June 18, 2014
State of the Onion: June
Just a quick update: I am actually still working on my wall. Weekends I'm trying to get out as much as possible and climb on Real Rock or at least Real Indoor Rock, but weeknights are all sawdust, all the time. I've started a real training regimen on the wall, too, which I'll detail later.
Here's the State of the Wall as of June 19th:

Not much has changed on the main section, save for the addition of some new holds. Holds density is starting to get decent, and the most frequently used ones are getting that nice chalky look. In the lower left of this picture, you can see that the corner has mostly been filled; even with no holds, this provides a nice area for smearing. The hole was awkward.

The arete is complete, and that is su-weet. Lots of interesting moves and problems can be made in this area. I still want to put up a few more holds here, especially for heel-hooks and corner pinches from the right.
The biggest change over the last month is the flat section:

It just keeps growing! I originally didn't plan for a very big vertical section, reasoning that the limited height of the wall would make it less useful. As I built, though, I came to realize a few points in favor of this sort of traversing area:
Here's the State of the Wall as of June 19th:
Not much has changed on the main section, save for the addition of some new holds. Holds density is starting to get decent, and the most frequently used ones are getting that nice chalky look. In the lower left of this picture, you can see that the corner has mostly been filled; even with no holds, this provides a nice area for smearing. The hole was awkward.
The arete is complete, and that is su-weet. Lots of interesting moves and problems can be made in this area. I still want to put up a few more holds here, especially for heel-hooks and corner pinches from the right.
The biggest change over the last month is the flat section:
It just keeps growing! I originally didn't plan for a very big vertical section, reasoning that the limited height of the wall would make it less useful. As I built, though, I came to realize a few points in favor of this sort of traversing area:
- It lets me use a lot of holds that would be nearly impossible to use on the steeper sections, at least for me
- It lets me practice more technical movement on bad holds, something I'm weak at.
- It gives the kids and beginners something to do when they lack the power to use the steeper areas, even with good holds
So I've built out, and a bit up. The highest point of the flat wall I can barely reach from the ground, so with careful setting I can make problems that take several moves to get to the top. Traverses are good, too. I'll probably build this out with one more half-length panel (each of these is roughly 450 cm in width)
I've also made the garage a more appealing place to be, with better lighting and music. And a heater, which I should't have to use until fall. You hear that, Hokkaido? I shouldn't have to use it. I should not be using a heater in June. Ahem. Anyhow, that's it for the update. Stay tuned for another Fantasy Gym coming soon, and a profile of a non-Fantasy Gym, aka a real gym, the one I go to most often. Cheers!
Sunday, June 15, 2014
Fantasy Gym: Rock Hard
Hello, and welcome to another edition of Fantasy Gyms, the blog segment in which I kill downtime at work messing around with Sketchup present new and exciting ideas for theoretical gyms! Previous fantasy gyms have included The Rock Box and The Starwhal. Check them out if you haven't!
For today's project, I started with building dimensions, creating a 10 x 15 meter building with a maximum roof height of 8 meters. Despite the Fantasy Gyms tag, this gym was designed with realism in mind- this is the sort of thing that one person could reasonably build, in a building of a sort that can be found all over Hokkaido, where I live. One of these days I'll do something really wild.
In addition to keeping things to a reasonable level of feasibility, I tried to focus on a couple of other guidelines in the design:
Presenting: Rock Hard!


Enter the climbing area. Let the scent of chalk and sweat embrace you like a warm and very athletic grandmother.

On the north side of the building we have the first segment of climbing wall, the In n' Out. The In n' Out is based around the Out, a 40-degree overhang with a 45-degree slab top for mantle problems. I'm a big fan of these kinds of mantle areas, and include them in most of my designs. The right side of the Out begins as a much shallower 20 degree overhang before transitioning to the 40 degree. The left side is the In, a cave with a 10-degree back wall that transitions into a 75-degree near-horizontal roof. This section, too, includes a mantle out; the top section is a 20 degree slab, making for a difficult transition from the roof. The left side of the Out, as you can see, pushes into the cave for a steep arete. Topout height of this section is just over 3 meters, and the section is 7 and a half meters long.

Moving to the left of the cave area is a short transition section of vertical wall:

This transitional segment consists of three vertical walls of around 1.25 meters in width each. The corners are wide angles- I tried to avoid just having 90-degree transitions between walls, and add more interesting transitions. The corner leads into the back wall, a wide and flat 15-degree overhang. It's 4.5 meters off the ground, which means falling from up here will be exciting.

The back wall meets with this big overhang-thing, which I don't have a clever name for. The Pain Train? The Tickler? The Big Overhang Cave Thing? Your guess is as good as mine. The bottom area is 85 degrees of full-time fun, transitioning into a 45 degree area and finally a vertical finishing area.

The side of this feature is slightly more than vertical, transitioning into vertical. Lately I like these sorts of roof-into-flat transition areas; I think they offer a lot of interesting moves. Like the back wall, this thing is over 4 meters tall, which is certainly enough to make me wet myself.

Moving on from the... uh, the big thing... is the last segment of wall. The centerpiece here is a big projecting prow, 30 degrees steepening to 50 degrees and only a meter across at the top. The theme here is arete moves, possibly on two aretes at a time. I'd probably call it Mr. Hugs.
To the left is another 15-degree wall that cuts back into a large crevice before joining the prow. This crevice has an inner angle of less than 90 degrees, and provides a good area for stemming moves and the like. Not strictly necessary, but I liked putting it there better than transitioning straight into the prow. The left side is a flat wall, and probably the best area for beginners. A 15 degree slab finishes out the wall.

On to the non-climbing stuff! Past the slab we see the raised deck, which if you haven't noticed is something I really like putting in. Climbers love hanging out in high places, right?

This area is strictly for Chilling. Chilling is an important and underrated part of a well-balanced climbing schedule. Really garish sofas, too. Of course the deck provides a good vantage for watching competitions and climbing events, too, but the chilling is the main point.

Finishing out a mantle problem on the In n' Out takes one up to the deck, as I think having room to actually top out and walk out is cool. There's a ladder available for those who are too lame to go up this way or who don't want to navigate a boulder problem while holding a six-pack of beer (losers).

Below the deck, of course, is the important stuff. Don't mix up which of these areas is which, please!
And that about covers it! Let me know if you have any feedback- would this be fun to climb on? Boring? Interesting? Unrealistic? I have no idea what I'm doing, obviously, but I like thinking up designs for climbing gyms and you can't stop me.
As a preview of our next stop, I'm going to turn this decommissioned Mr. Donuts-

-into a sweet-ass gym! Maybe! It might still smell like donuts though.
Until next time!
For today's project, I started with building dimensions, creating a 10 x 15 meter building with a maximum roof height of 8 meters. Despite the Fantasy Gyms tag, this gym was designed with realism in mind- this is the sort of thing that one person could reasonably build, in a building of a sort that can be found all over Hokkaido, where I live. One of these days I'll do something really wild.
In addition to keeping things to a reasonable level of feasibility, I tried to focus on a couple of other guidelines in the design:
- The gym should provide an interesting variety of climbing surfaces and situations, obviously
- The gym should include space to rest and relax while not climbing
- The gym should lend itself to local competitions, which is to say that people should comfortably be able to watch the climbers. The two gyms I spend most of my time at are quite different in this regard, something I'll write a future blog post about
- The gym should contain as many totally sweet posters as possible. I did a pretty good job here but I think there's room for improvement.
Presenting: Rock Hard!
Sited in a completely vacant grassy field (apparently), Rock Hard used to be a, uh, we'll say storehouse for chain-link fence.
Welcome! Here you see the front desk, made from plywood. Everything is made from plywood, because I love plywood. It's what drew me to climbing in the first place! But you didn't come for the check-in desk, as beautiful as it may be- turn left and you'll see the climbing area!
Enter the climbing area. Let the scent of chalk and sweat embrace you like a warm and very athletic grandmother.
The In n' Out
On the north side of the building we have the first segment of climbing wall, the In n' Out. The In n' Out is based around the Out, a 40-degree overhang with a 45-degree slab top for mantle problems. I'm a big fan of these kinds of mantle areas, and include them in most of my designs. The right side of the Out begins as a much shallower 20 degree overhang before transitioning to the 40 degree. The left side is the In, a cave with a 10-degree back wall that transitions into a 75-degree near-horizontal roof. This section, too, includes a mantle out; the top section is a 20 degree slab, making for a difficult transition from the roof. The left side of the Out, as you can see, pushes into the cave for a steep arete. Topout height of this section is just over 3 meters, and the section is 7 and a half meters long.
Another view of the In n' Out
Moving to the left of the cave area is a short transition section of vertical wall:
This transitional segment consists of three vertical walls of around 1.25 meters in width each. The corners are wide angles- I tried to avoid just having 90-degree transitions between walls, and add more interesting transitions. The corner leads into the back wall, a wide and flat 15-degree overhang. It's 4.5 meters off the ground, which means falling from up here will be exciting.
The back wall meets with this big overhang-thing, which I don't have a clever name for. The Pain Train? The Tickler? The Big Overhang Cave Thing? Your guess is as good as mine. The bottom area is 85 degrees of full-time fun, transitioning into a 45 degree area and finally a vertical finishing area.
I kind of like the name "The Pulverizer"
The side of this feature is slightly more than vertical, transitioning into vertical. Lately I like these sorts of roof-into-flat transition areas; I think they offer a lot of interesting moves. Like the back wall, this thing is over 4 meters tall, which is certainly enough to make me wet myself.
Moving on from the... uh, the big thing... is the last segment of wall. The centerpiece here is a big projecting prow, 30 degrees steepening to 50 degrees and only a meter across at the top. The theme here is arete moves, possibly on two aretes at a time. I'd probably call it Mr. Hugs.
To the left is another 15-degree wall that cuts back into a large crevice before joining the prow. This crevice has an inner angle of less than 90 degrees, and provides a good area for stemming moves and the like. Not strictly necessary, but I liked putting it there better than transitioning straight into the prow. The left side is a flat wall, and probably the best area for beginners. A 15 degree slab finishes out the wall.
On to the non-climbing stuff! Past the slab we see the raised deck, which if you haven't noticed is something I really like putting in. Climbers love hanging out in high places, right?
This area is strictly for Chilling. Chilling is an important and underrated part of a well-balanced climbing schedule. Really garish sofas, too. Of course the deck provides a good vantage for watching competitions and climbing events, too, but the chilling is the main point.
Gosh, these girders are fascinating!
Finishing out a mantle problem on the In n' Out takes one up to the deck, as I think having room to actually top out and walk out is cool. There's a ladder available for those who are too lame to go up this way or who don't want to navigate a boulder problem while holding a six-pack of beer (losers).
Below the deck, of course, is the important stuff. Don't mix up which of these areas is which, please!
And that about covers it! Let me know if you have any feedback- would this be fun to climb on? Boring? Interesting? Unrealistic? I have no idea what I'm doing, obviously, but I like thinking up designs for climbing gyms and you can't stop me.
As a preview of our next stop, I'm going to turn this decommissioned Mr. Donuts-
-into a sweet-ass gym! Maybe! It might still smell like donuts though.
Until next time!
Wednesday, June 4, 2014
Event Report: 36 Whiskeys 2014 First Round

On Sunday, June 1st, after a long day of cycling and uh, drinking, Charles and Jordan and I headed to Sapporo for the first 36 Whiskeys competition of the year at Whippersnapper. Writing this makes me realize that I haven't ever posted about Whippersnapper, which I'll have to do some time. For now, say that Whippersnapper is one of several gyms in Sapporo, and is my favorite. That's the storefront and the manager, above. Several times a year, they hold climbing events called 36 Whiskeys. This is their story.

This event was the biggest yet, with more than 70 climbers registered. Whippersnapper isn't a big place, so this can get a little crowded, but the event was well-managed and ran smoothly.

Climbers were split into two groups, creatively named A Group and B Group. A Group had an hour and a half to climb, followed right away by B Group. Then they repeated, so that each group had three total hours, split in half. This was, I think, a great way to run the competition. It allowed a huge number of climbers to compete, and to have a long rest midway through; I was gassed by the end of the first round, but got my second wind watching the other climbers and refueling during my down time.

Same overhang as before, from the other side
As for the competition itself, it worked like this. 36 problems were set on the wall, ranging from very easy yellow-tape problems to ball-crushing black problems. In theory, the hardest problems were around 1-2 dan, or V8-V9.

These volumes were new to the wall, and added a lot (of suffering)
In their two 1.5 hour sessions, each climber could climb whatever problem they wished, as many times as they wanted- but only one climber at a time on each of the four sections of the wall. Average waiting time to get back on the wall was only around three or four minutes, but knowing that you couldn't just hop back on the problem if you fell did add some pressure. That, and the other climbers watching and cheering.


It's me!
In the first half of the competition, I managed all of the pink problems, which were pegged at 7-6kyu, which is maybe V2. I tried each of the problems of the next grade up, and while I didn't send any of them I was able to decide which ones to attack in my second half. That's one of them, up above.

Charles tries the technical volume problem
In my second half, I had two 6kyu problems picked out that I thought I had a good chance of sending. One was a slightly overhanging technical problem on a number of volumes, with bad holds and tricky feet, and the other was a fairly straightforward problem with a blobby, difficult-to-match hold in the center that I had trouble surpassing. I was able to get the first of the two on my first shot after the break; success! And the power of rest! I'm usually far too impatient to take long rests during a session, but this enforced break showed me the real value of getting refocused.

Thanks for the pic, Charles!

In addition to getting to climb on some sweet problems in an intense environment, the competition also allowed us to watch some real talented climbers push themselves hard. The climbers here may not be world-class, but this competition does draw the best athletes from in and around Sapporo and was really inspiring. At the top level, I think we saw four or five total sends of black-tape problems, with a round of applause every time it happened.
In any case, a good time was had by all. I wish I had taken the opportunity to take more pictures, but I was too focused on climbing! Charles and Jordan kindly took some shots of me climbing; I wish I had returned the favor.
Looking forward to next time, and to getting out on some real boulders and a sport crag this weekend! Also look forward to an update on the home wall soon. Until then!
(all pictures courtesy of Whippersnapper Gym except where noted)
Thursday, May 29, 2014
Metolius Hold Review
Hold review: Metolius Granite Macros, Hueco Macros, and Cobblestone Modulars

Continuing in a series, I'd like to
offer a quick review of a few Metolius holds I picked up recently,
since information on specific sets and holds in the Metolius line
seems hard to come by on the internet. The two sets I'd like to
review today are the Granite and Hueco macro sets, sold in packs of
two, and a 5-pack of Cobblestone Modulars. In-depth reviews follow; if you want to read the lowdown, skip to the end.
Hueco Macro 2-Pack (Set B)

Keys not for scale, I just happened to have them there
If those don't look interesting to you,
you must not spend as much time window-shopping holds on the internet
as I do (not a bad thing). These guys are big and heavy, and pack a
huge amount of detail into the interior of the hold. In nearly any
orientation, you'll find something to use, whether it be a narrow
pocket, incut crimp, deep pinch, or easy jug. The texture is good,
and a bit grittier than some Metolious holds I've tried; if you
wanted, you could even use the unfeatured part of the one on the left
as a sloper.

I circled it, in case you weren't sure which hold I was reviewing.
The larger of the two holds I placed on
my flat wall, arranged so the best part of the hold faces up. In my
recent competition, people seemed to prefer to use this as a pinchey
sidepull. The divots arranged along the bottom can be used as crimpy
pockets, but if you can reach the upper part of the hold I don't know
why you'd want to. Arranged with the jug side facing this right way,
this would be a solid hold even on quite steep ground.

This kind of pinch seems to be the best way to grab the hold straight-on, in this orientation
The second of the two was about as
juggy, and I put it right side up on the 40 degree overhand. This
provides a nice full-hand pocket that can be pinched for added power.
On a 40 degree incline the hold feels great from directly below, but
won't offer much traction as you get further out from the wall like a
jug would.

Maybe not quite full-hand
Flipped upside down, the underside of
the hold offers a fairly good crimp that would be slightly less than
positive on a slight incline and pretty bomber on a slab.

Both of these holds offer a wealth of
setting options on all levels of steepness, and I love using them.
You could probably even put them on a roof for a very tough pinching
challenge.
One thing I'd note is that although I haven't had any issues yet, these holds lack anti-spin screw holds, like all Metolius holds. The large backing area seems to help, though, and adding a screw in the pocket would be an easy fix. Certainly it doesn't seem like the same glaring lack as the Incut Edges ledges. Anyhow, moving right along to...
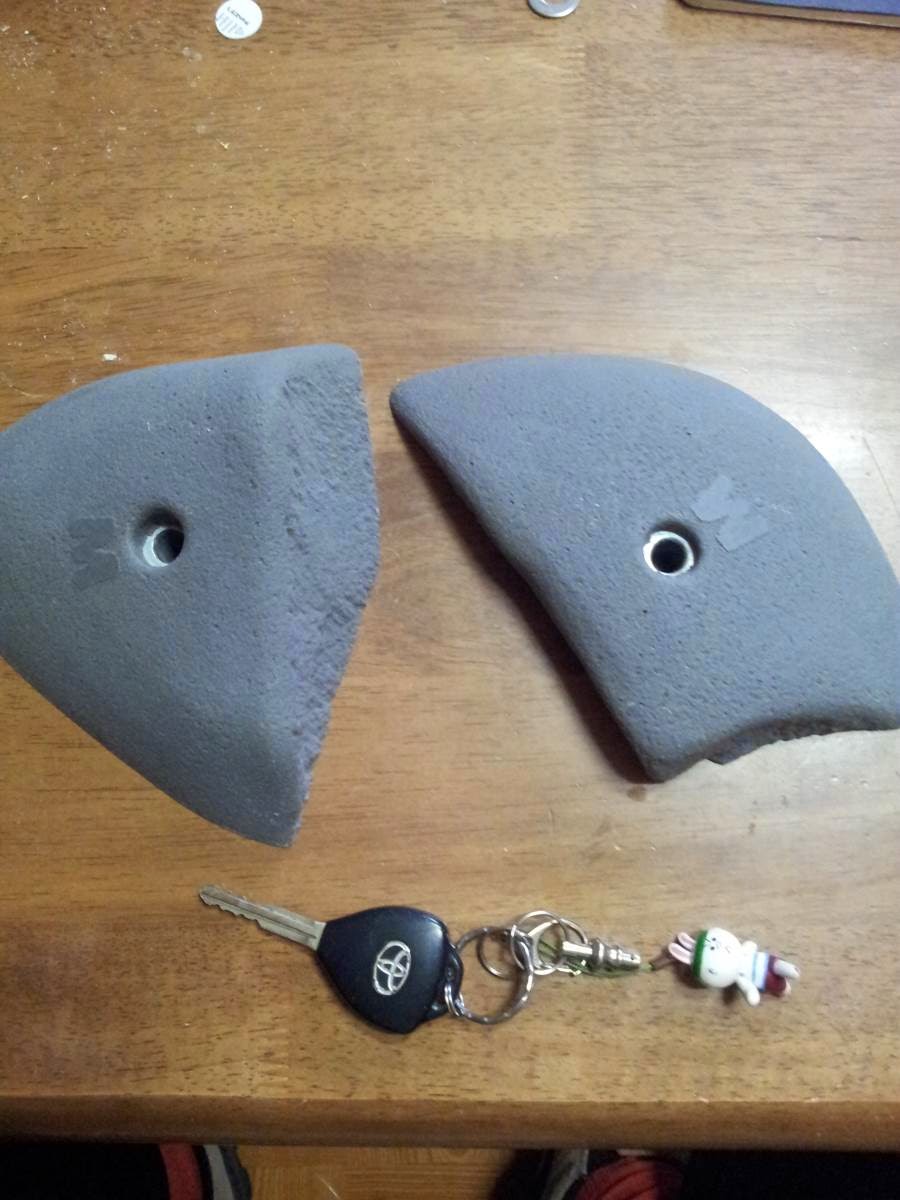
Granite Macro 2-Pack (set C)
One thing I'd note is that although I haven't had any issues yet, these holds lack anti-spin screw holds, like all Metolius holds. The large backing area seems to help, though, and adding a screw in the pocket would be an easy fix. Certainly it doesn't seem like the same glaring lack as the Incut Edges ledges. Anyhow, moving right along to...
Granite Macro 2-Pack (set C)
I really need to find a good place to store my keys
Again, two big holds, but not quite as
featured or versatile as the Huecos above. The “outside” of these
holds feels quite smooth, while the “inside” has a nice roughened
texture... which still feels pretty smooth. These don't have the same
level of grit as the Huecos or the Cobblestones.

The larger of the two I put on the flat
wall (you can actually see the bottom of the Hueco above it). Aside
from tilting it slightly or trying to use it as the World's Worst
Sidepull, you're more or less stuck with a single orientation here.
The top of the hold is a fairly thin ledge that ranges from almost
neutral on the right side to quite negative on the left. The lip all
across is quite sloped and while it doesn't feel that difficult, it's no jug.

Of note for setting problems is that
this hold seems to look a lot better than it actually is. I've seen a
lot of people go for it and then recoil like it was a hot stove. In
the picture above I'm holding the best part of the hold- it looks
like there's a bit of a lip on the other side, but there really
isn't. I want to set a problem that forces a match on this guy, which
would really take some careful movement. I have it set quite low, too, which adds to the fun.

The second of the two offers two
useable edges, a neutral one and one that's just slightly positive on
my 40 degree incline. Both faces are much narrower than on the larger
hold, about a pad and a half to two pads deep.

The incut side is what I have up here,
and matching on feels pretty good. The incut side would be very good
on anything less steep and hard as hell on anything steeper. There's
more of a lip here than on the other hold, but just barely. On a
flat wall, the other side would offer a slopey crimp.
These two holds are certainly less
versatile than some, but work well if you want some slopey ledges. I
bought them to put on the flat wall, and put one on the 40 when it
turned out to be more positive than I expected. Like the Huecos above, I haven't had any issues with spinning on them yet.
Cobblestone Modulars 5-Pack (Set C)

Honk if you love slopers! Like the Granite pieces above, I bought these in preparation for the building of my flat section, and they turned out great. Metolius's Cobblestone line consists of all sizes of flat slopers. This set ranges from the big and fat (lower right) to the nearly non-existant (bottom). Although these holds are simple, they feature a great gritty texture and versatile design.

The centerpiece of this set, for me, is the fatty shown above (lower right in the top picture). This sloper bulges out at the top just enough to be very slightly positive on my 30 degree wall, which is where it lives now. As you can see by the chalk, it gets a lot of use, lending itself well to interesting problems and being a perfect level of difficulty for me at this steepness. On anything up to about 15 degrees, this would be an easy sloper for a beginner. Past that it gets harder; I can match and move past it with careful footwork and slow moves, and a stronger climber could incorporate it into more dynamic moves. On anything steeper than this, I think it would get pretty difficult to use, being too fat to effectively pinch.

The rest of the set is much smaller, and I have them on the flats. All are quite similar, with one side of the hold offering a slightly more positive surface. All of them are small enough to act as pinches.

How good the holds are at sub-optimal angles depends on the hold- some are fat enough to be decent even when hanging out, and some can only be used from directly below.

The flattest of the holds I haven't found a home for yet- I'm waiting to put it on a volume or possibly the arete, the only places I think it would be worth using. It's incredibly shallow.

Oh yeah, I did put another one on the 30, but it's awful. A stronger climber could probably use it- this is the most positive hold after the big one, but it's still negative on a 30.
On a final note, I have had some problems with spinning on the big sloper. The hold is fat and positive enough to invite lean-outs and compression moves, but these can cause it to spin; the bolt hole is slightly below center, so if the sides of the positive area are grasped and pulled left or right, it can spin. Like all Metolius holds, a screw hole would be very welcome here, especially since the shape of the hold makes perimeter screws difficult.
The Lowdown:
Hueco Macros: Versatile and fun to set with. Good for vertical to steeply overhung, probably tough on a roof.
Granite Macros: Good sloper ledge and a thin crimp ledge. Not very versatile. Great on vertical, smaller of the two usable up to 45 or so.
Cobblestone Modulars: Great slopers, good texture. Great on vertical to slightly overhanging, with one big hold that can go a bit steeper.
Thanks for reading!
Cobblestone Modulars 5-Pack (Set C)
Honk if you love slopers! Like the Granite pieces above, I bought these in preparation for the building of my flat section, and they turned out great. Metolius's Cobblestone line consists of all sizes of flat slopers. This set ranges from the big and fat (lower right) to the nearly non-existant (bottom). Although these holds are simple, they feature a great gritty texture and versatile design.
The centerpiece of this set, for me, is the fatty shown above (lower right in the top picture). This sloper bulges out at the top just enough to be very slightly positive on my 30 degree wall, which is where it lives now. As you can see by the chalk, it gets a lot of use, lending itself well to interesting problems and being a perfect level of difficulty for me at this steepness. On anything up to about 15 degrees, this would be an easy sloper for a beginner. Past that it gets harder; I can match and move past it with careful footwork and slow moves, and a stronger climber could incorporate it into more dynamic moves. On anything steeper than this, I think it would get pretty difficult to use, being too fat to effectively pinch.
Two hands will fit, barely
The rest of the set is much smaller, and I have them on the flats. All are quite similar, with one side of the hold offering a slightly more positive surface. All of them are small enough to act as pinches.
How good the holds are at sub-optimal angles depends on the hold- some are fat enough to be decent even when hanging out, and some can only be used from directly below.
The flattest of the holds I haven't found a home for yet- I'm waiting to put it on a volume or possibly the arete, the only places I think it would be worth using. It's incredibly shallow.
Oh yeah, I did put another one on the 30, but it's awful. A stronger climber could probably use it- this is the most positive hold after the big one, but it's still negative on a 30.
On a final note, I have had some problems with spinning on the big sloper. The hold is fat and positive enough to invite lean-outs and compression moves, but these can cause it to spin; the bolt hole is slightly below center, so if the sides of the positive area are grasped and pulled left or right, it can spin. Like all Metolius holds, a screw hole would be very welcome here, especially since the shape of the hold makes perimeter screws difficult.
The Lowdown:
Hueco Macros: Versatile and fun to set with. Good for vertical to steeply overhung, probably tough on a roof.
Granite Macros: Good sloper ledge and a thin crimp ledge. Not very versatile. Great on vertical, smaller of the two usable up to 45 or so.
Cobblestone Modulars: Great slopers, good texture. Great on vertical to slightly overhanging, with one big hold that can go a bit steeper.
Thanks for reading!
Tuesday, May 27, 2014
The First Semiperiodic Garage Bouldering Competition and Barbeque in Nishiokoppe

This is bouldering
Last weekend, my garage bouldering wall had its first real public debut, in the form of a (extremely casual) climbing competition and (deadly serious) barbecue! Everything went off without a hitch... more or less. Hitches encountered were small and easily surmounted. Well, they could have been bigger. Nobody died.
.jpg)
.jpg)
None of these holds broke and injured anybody. Success!
I worked overtime to make sure I had at least part of the vertical section up on the wall, which I thought would help with developing problems that beginners could do. More than half of the attendees had little or no climbing experience, and having this section proved to be a good idea, especially with the kids.

Preparing to climb. Safety first!
In the context of Hokkaido spring, the weather was fair: almost ten degrees above freezing and not actively downpouring. Although the competition took place in the garage, barbecuing and general grab-assery were slated for the yard outside, so the off-and-on drizzle posed a problem. We solved the problem with several beers, a few feet of twine, a big tarp, and two convenient laundry poles, but due perhaps to the beer nobody actually thought to take a picture of our makeshift shelter. This regret will live with me until my dying day.

Let the climbing begin!
The format of the "competition" was, let us say, "casual". I prepared eight problems in four ranks of ascending difficulty, and originally had the idea of giving each climber five minutes to try each problem before putting the next one up. Since I was trying to cook and mark problems at the same time, I quickly decided that timekeeping was simply too much work.

The green one! The OTHER green one!
When everyone had climbed a given problem, I marked the next one in chalk- the school kind, not the hand kind. This was super-visible and worked great for the first few, but turned out to be a bit tough to erase. I'm not sure if I'd do it this way again.

Which way is up?
Setting interesting and enjoyable problems on a wall the size of mine required some creative thinking. A few of the problems had foot goals- to complete the problem, the feet had to be placed on a specific hold. This worked out well and added a lot of length. Another option was downclimb problems- start at the top and get to a hold near the bottom, which really changes it up. Adding these variations helped keep it interesting, given that the only others were really short straight climbs and traverses.

Potential for head injury: fun!
I learned a lot from hosting this event, and would like to do it again. A few kids from the village even showed up and tried their hand at climbing; this is where the vertical wall really saw a lot of use.

Pictured: not a village kid
I even cued up music for each of the sets of problems, but I turned out to not have an extension cord. Added that to the shopping list for next time, along with more seating.

This was probably a foot goal problem
Some things I would change for next time: more cameras. We only really had one camera, which means limited pictures and angles.

Sometimes holds need tightening... mid-climb
I'd also give myself less to do at once. I tried to cook, run the competition, socialize, and take pictures all at the same time... it didn't work. Better organization would help things run more smoothly, even if it is just a casual event.

The Magic of Climbing
All in all, though, a great night and a reassuring sign that my construction techniques, although perhaps let's say "unorthodox", were sufficient to create a structure capable of being climbed on all night without murdering anybody. So that's good. Hope next time will be even bigger and better, and thanks for reading!

Subscribe to:
Posts (Atom)