Thursday, January 30, 2014

Installing T-Nuts

When you imagine the process of building an indoor climbing wall, you probably imagine lots of framing, hanging, drilling, sawing- the processes through which the wall itself takes shape. And that's accurate- without these sorts of things the wall wouldn't happen. What you may not think of is the creation of each individual mounting point for holds. Each hole, after being drilled, requires the installation of a T-Nut, and that's the process I'll cover today.

This is a T-Nut:
Awesome, right? It's a threaded barrel with a a flared collar on one end, kind of like a T. The collar has four prongs on it. 

To install it we'll use a highly advanced "Specialized T-Nut Installation Tool" (S'TIT):

I'll sell you one if you're interested. It's very specialized.

To begin with, we'll insert the S'TIT into our hole of choice. Each full sheet of plywood on my project has 100+ holes so we've got plenty to choose from. Oh boy! The bolt goes in through the climbing side of the wall, just like a hold.

Like so. Then we go around to the back of the wall...

...and thread the T-Nut onto the protruding bolt, prongs down. Installation of the T-Nuts requires access to the back of the wall, which is why I'm doing it now before assembling the thing.

The T-Nut is screwed down as far as possible by hand. The prongs end up resting against the pristine and defenseless wood.

Then we go back to the front of the wall and screw down the bolt. As the bolt is tightened, the T-Nut is drawn into the wood (this makes a nice crunching sound). The bolt is tightened until the collar of the bolt is flush with the wood, and then the bolt and the S'TIT are removed. I took a picture of this process but it mysteriously disappeared into the electronic ether. Oh well. Doing this with a ratchet makes it much, much easier.
From the front, the finished hole looks like this. Now you can bolt a hold onto the hole and tighten it into the T-Nut; the nut provides thread for the bolt and the prongs sunk into the wood prevent the nut from spinning. The major advantage here is that you don't have to have access to the back of the wall to change out holds.

And that's that! Repeat this process a few hundred times and you have a wall ready for holds. Beer is recommended for this process. No blood was drawn... this time.

Tuesday, January 28, 2014

There Will Be Blood

This is a Forstner bit:
It has many applications. When applied to wood, it results in this:
That's great. I specifically got one to work on making holds (more on that in another post). 
When applied to a hand, it results in this:
Huh huh. Woah. Like, gnarly. It looked a lot worse when it happened but turned out to be minor. Lesson learned here: A hand is not a bench vice, especially not when working with a little bitty chunk of wood and a big burly drill bit. I probably could have figured that out without putting a hole in my thumbnail but I like to make sure.

This is actually the second time my wall has been christened with blood but the first time was just from a ripped hangnail and it wasn't even mine. Wall hungers for blood. In all likelyhood, wall will get more blood. Blood for the blood wall.

Stay tuned for more nasty pictures of my various limbs!


Sunday, January 26, 2014

Kuraimu V1, V2, and V3

So the current project- building a bouldering cave in my garage, possibly dying- is called Kuraimu, a name I explained in my previous post. Technically, however, it's Kuraimu V4, which has nothing to do with bouldering grades and everything to do with the fact that I'm a nerd and like naming things. So what were Kuraimus V1-3? Stay tuned.

I first decided that I wanted a way to work on my bouldering at home in November of 2013 or so. The obvious option for home training, of course, is a hangboard:

I chose not to go this route for two reasons:
- I don't own my house and so am hesitant to drive screws into the walls, and
- I like making things.

So I made a thing:

Terrifying, isn't it? That's a small-size sheet of plywood with a few holds drilled into it, fixed to a freestanding pullup bar with wires. This was Kuraimu V1, although I didn't give it a name at the time because it wasn't the sort of thing you refer to as anything other than "That horrible thing taking up floorspace in the spare room." It was good for hanging on and working on grips- I did add more holds- but I wanted more. More.

So I designed this:

A freestanding wooden frame for the thing. This would function in essentially the same way as the V1 version, but would (in theory) be much less janky. Plus I could throw in a full-height pullup bar while I was at it. That turned into this:

Neat! This actually worked pretty well and yes, I did tape "routes" onto it. I'm sorry. This thing turned out to be quite stable, despite screwing up the design- see if you can spot where I nailed something into the wrong place. This thing was solid, and the adjustable angle worked well. The old futon set below it also turned out to work pretty well.

On the downside, the feet resting on the floor made things quite different. When going for a hold, it became possible to to really adjust body positioning and get your weight under even the shittiest crimp, making it easier. Not exactly realistic, but still good for training as long as you had discipline, I suppose. I eventually added a crossbar at the far end of the floor supports, supplying something to push against with the feet.

It was at this point that I came up with the name Kuraimu, being stoked as hell about having Made A Thing. I christened it Kuraimu V2, using the V2 designation to differentiate it from the larval form.

The biggest result of building this mock hangboard, however, was that I decided that I did want to go ahead and try for a full-sized wall. I enjoyed the construction process and the product was solid, and I had already invested in a lot of the tools that would be necessary. As a final test-run, however, I produced this:

Kuraimu V3! This is the same frame, but with a full-sized sheet of plywood attached. This is the same sort of thing I'd make a full wall out of, and in fact the panel will eventually be used in the final result. Drilling and placing T-Nuts in this wall did give me an idea of how much work a real wall would be, but I still decided to go ahead.

In the meantime, I'm having fun with this thing. The wall is stable at a very slight overhang, and provides an interesting and fairly realistic climbing experience. One issue I failed to predict was that any kind of sideways movement is risky; the wall wobbles side to side, and if you fall off to either side you'll fall right into the supports. So I can't do anything that isn't very static, but that's probably a good thing in any case. 

Hooray for climbing!

So anyway, there you have it: the Kuraimu family tree. Once the final wall starts coming together I'll remove the panel and put the "hangboard" back on to use as simple hanging practice. Until then, Kuraimu V3 serves as The Jankiest Climbing Wall in Japan. Free admission!


Thursday, January 23, 2014

What the heck is a Kuraimu

You may have noticed that this blog is called Kuraimu. You probably did notice; it's right there in the URL and at the top of the page. So what the heck does it mean?

Well, Kuraimu is the name I gave to my wall. The first one was the janky hangboard I started my journey with- I'll do a post about that at another time.

Kuraimu is written in Japanese as くらい夢. That last character means "dream", and put together it sounds like, well, climb. What's that character doing in there? In the village I live in, many buildings and facilities have names that end in 夢, or "mu" - the hotel is called Rimu, the woodworking museum/community center is called Komu, the big flower garden is called Kamu, etc.. It's one of the ways my village creates a sense of cohesion and community- another one is painting all the buildings orange, but that's a topic for another day. It's because of that naming scheme that I gave my wall the name Kuraimu. Yes, I realize that naming a wall I haven't built yet is like a high schooler designing album covers for a band that doesn't exist. Shut up, it's gonna be awesome.

The Design

Alright, here's what I want to build. Do you like looking at screenshots of Sketchup? I hope so because I'm about to drop dozens of them. As an aside, Sketchup is some sweet-ass software, and I did all this with the free version. After putting together my model I had exact measurements to take to the hardware store. Right on.

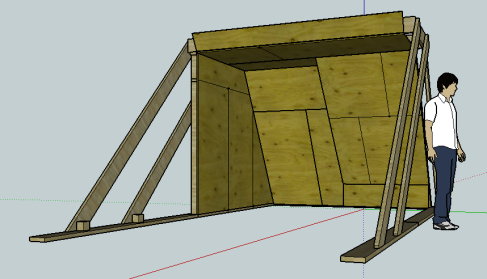
So here's the design:

Image

Wow! Amazing! is what you might say, and I'd beam proudly. Or you might say "Boy, that looks really small, what gives," and I'd answer that my garage is unfortunately short and narrow. I'll post pictures of it later.

The basic stats:

2 overhanging walls, 1.4 m width each, at 40 degree and 30 degree angles. Kicked panel on the 40.

Vertical wall, 2.1 meters in height and 2.7 meters wide at widest point. Another wall can be added later.

Roof section and small finishing panel.

Wall framing in 2x4s; structural support in 2x8s.

Here's some more pictures:

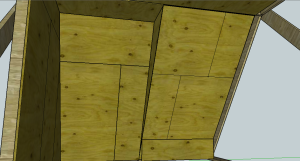
design_2

The overhung sections. There will be a small transitional corner between the two sides. Total of 2.7 meters of horizontal traverse from one side to the other.

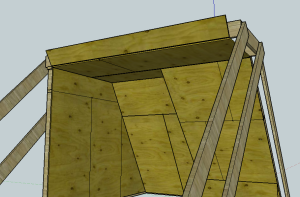
design_3

The roof and finishing panel. To maximize route length, I plan to have most problems go up onto the roof and finish at the rim.

design_4

The back of the wall. Each panel is framed with 2x4s and joined to adjacent panels, and all panels are held up and in place by 2x8 framing members. The supporting frame can be seen here as the two inclined supports, long floor member, and roof crossbars.

Well, that's the plan, anyway. This design was the best I could do with the space available. I wanted to keep it simple, but not too simple- this is essentially a lean-to with additions made to allow for multiple wall angles. Given the limited wall space available, I think that having the transitional corner between the 30 and 40 degree sections will provide a lot of challenge and variety. That's the hope, anyway!

Additionally, the design leaves open the possibility of adding on more vertical wall sections extending out along the support beams. Not something I plan on doing right now, but an option if I decide I want more traverse or something.

The entire thing is free-standing.

Allow Me to Show You My Wood

Hi and welcome to My Blog. The purpose of this blog is to record the design and construction of my home climbing wall. Home climbing walls, generally constructed out of plywood, are colloquially known as "woodies," a fact that will account for about 99% of the many, many childish jokes I plan on inflicting on any potential reader. You've been warned.

There are about seventeen thousand pictures of homegrown wood on the internet, and that's not counting the stuff that has nothing to do with climbing. My wall isn't- or won't be- the best, biggest, or coolest. It's projected to be pretty modest, actually, and as an amateur-at-best woodworker I imagine it will have some interesting and unintended design "features." So why the blog? When I was planning out my wall I perused a number of blogs and forum posts about the design and construction of home walls, and found them interesting and useful. So I thought, well, why not. Plus I like blogging.

In particular, I found Andy Libre's blog to be very useful and inspirational. Pictures of his sweet-ass outdoor wall can commonly be found lurking in Google image searches and his blog is full of great information and pictures. Andy has pictures from his annual "Backyard Bouldering Comp," and these pictures are part of what pushed me over the edge into going dang, I want to do that. So I'm doing that. Hopefully somebody will find my adventures in woodworking to be educational, or just entertaining.